


Since Version 600.1601 workflows could also be executed live during you Create / Edit a record.
General
Default Workflows are executed in background and started by an configured trigger.
This allows powerful setups, but miss the situation you need to do a workflow, before user do something.
Currently you cannot directly interact with the user to show messages, tooltips or other actions directly during User is editing/creating a record.
Because this is a completely different topic, it was hard to implement and do NOT support features, which interact with user per default. (Show messages, request values, etc.)
These block needs to be modified to handle interactive with the user.
To give you an opportunity to see, if the task show something in frontend, you see a banner on top of Task configuration.
Green means user see the result directly. Orange means User do NOT see something.
If you see an orange banner on top of configurations, like “call webservice”, then this is no problem. Because this tasks won’t interact with the user.
Configuration
At first the following warning:
Frontend Workflows are executed EVERY time a condition is true and a field lost the focus, which is involved into the condition. Regardless, if the User already entered anything in a field you overwrite.
This means you MUST be sure to set the correct condition, which do not overwrite any User entered values. You could use the complex condition component to define the condition as detailed as possible. You also could check if a field was changed since last execution.
Use this functions advisedly!
[/TS-VCSC-Icon-Box-Tiny]
Frontend Workflows are configured a little bit different, then default Workflows.
- Create a Workflow and select the Trigger “Triggered in Edit-/CreateView” in start block. This enable three blocks, explained later:
- show Message in Frontend
- Frontend Action
- Frontend Confirmation
- Set your workflow, like you need. Use any tasks, like you need.
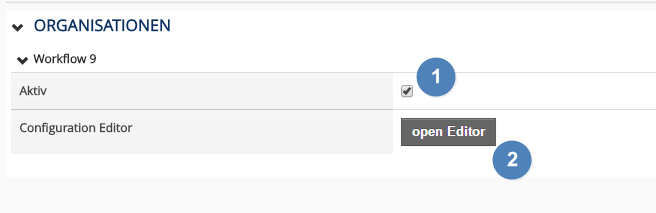
- Close the Workflow Editor and switch to Overview. Open “EditView Manager” in Sidebar of Workflow Designer.
- Add your Workflow by using the Drop Down top right
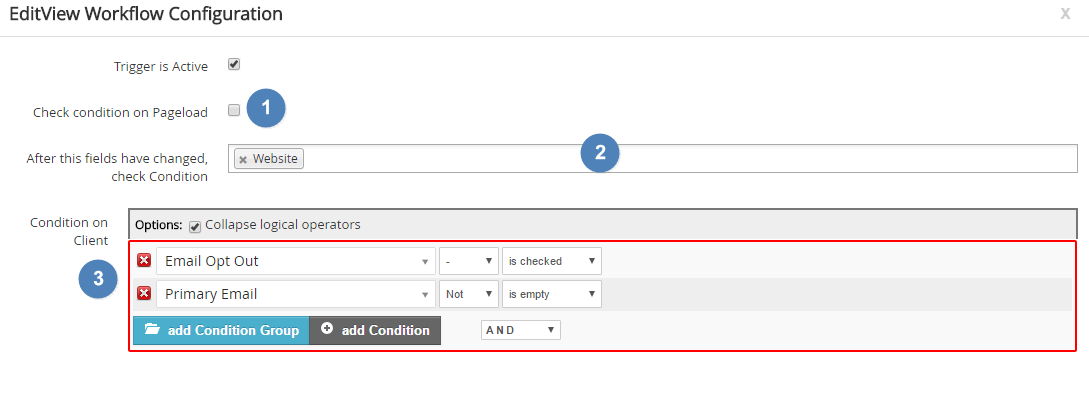
- Activate the configuration with 1 and open Condition Editor on 2, to define the situation, when this Workflow should be executed

- Define your condition and fields, which also trigger a Check of the condition.
- For example see this condition:

The Workflow is triggered EVERY time, when (3) the “Opt Out” field is checked and the Primary Email field is not empty and this field lost the cursor focus. (Or the website one)
The website field is not related to the Condition, but configured in 2 to also execute the Workflow.
(1) Define if the condition is also checked directly on Pageload of the EditView, when you for example have some default values and want to show some related information - To explain the notice on top of this page:
If you don’t know what you are doing and use “set values” of “industry” field within this workflow, the User cannot select an own industry. Because in the moment he enter the E-Mail Adress, this value will be overwritten. That’s why you should in this case add a condition “industry is empty” to prevent overwrite values. - Save the condition and test it. Have fun!
Extra Frontend Tasks
Show Message in Frontend
Because of implementation you cannot use the default “show message” block. That’s why there is a special one to show notices/errors etc to User with equal configuration like the default one.
Frontend Action
This is a major Task, related to Frontend Workflows, because it provide an interface for small frontend actions you could configure in Workflow.
It is also easy to implement own Frontend Actions with JavaScript.
Frontend Confirmation
This task allows you to let User confirm some decisions. The Workflow wait until the User click a Button in the confirmation box.
For example you could show the notice, customer is over credit limit and give them then chance to prevent errors.