


With the help of the Workflow Designer module it is possible to create more powerful and flexible Webforms very easily.
You also could use the Webforms from Workflow Designer if your Vtiger is created behind a firewall and you don’t want to open it for public users.
(Maybe HTTP Login, Client Certificates etc. or simple a hidden Domain)
Important information: The “non gateway” method was introduced with version 600.1620, and cannot be used before.
1. Create your Webform
You could use the internal Webforms Builder to create the HTML code of the Form or use a CMS to create the Form.
It is important to use fieldnames, equal to fieldnames in your CRM to make it easier.
2. Create the Workflow
Add a new Workflow in the module you want to create the record and add a block “write request values”, which is directly connected to the start block.
This block does all the work and could be used in several different ways.
Every variable you send with the request by GET or POST are available within the $env Environment variable. So you also could send a Record ID with the Request, which you set within the block.
3. Setup the HTTP Handler
After the creation of the Workflow this is another complex point and you need to configure it carefully if you don’t want to lost requests.
The HTTP Handler works with Permission entries. You could allow single IP’s or IP ranges access to one or more workflows. They cannot access other workflows then the configured ones. Otherwise they are able to trigger every action in your system.
 Open the HTTP Handler Settings
- Add a new Permission Entry
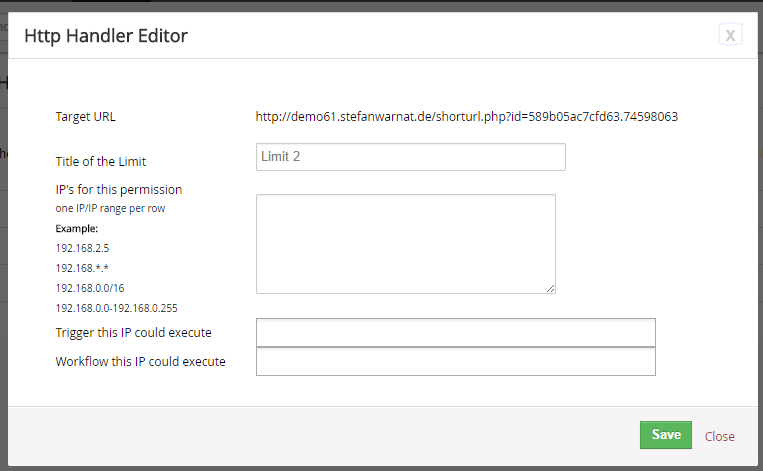
The most important information is the Target URL. They is required within the action attribute of your <form ..> HTML Tag.
The Title is something for you to remember the usage of this permission entry.
Within the next field “IP’s for this permission” you need to add a list of IP/CIDR/IP Ranges, which could call this Target URL. If you decide to use the HTTP Handler without the Gateway Script, you need only to enter a “*” within this field. This allow every IP to access. Per default the access is denied for all IP’s.
You could use single IP’s or IP ranges in the following formats:
-
192.168.0.*
-
192.168.0.100-192.168.0.160
-
192.168.0.0/24
To configure Triggers is only available for deprecation reason and cannot used in a efficient way.
The last Field allows you to enable single Workflows to be executed within this Permission Entry. The number before the Workflows is important, because it the ID you need to use in Webform.
Pay attention: Theoretically EVERY Workflow you enable in this list, could be executed by bad guys. There is no additional security layer, if IP match.
Press “Save” after you finished the configuration.
4. Update HTML Code of form or adjust the CMS Settings
In this step the setup with Gateway Script and without Gateway Script differ.
4.1 Without Gateway Script
In this setup the User directly Access a Short URL in your VtigerCRM.
You need to take the “Target URL” and set it into the Webforms action attribute, with two additions.
- You need to add the Workflow ID you want to execute with the variable workflow_id.
- You need to add the parameter direct with value 1 to give Workflow Designer the information he shouldn’t respond with a JSON string
Your final URL will look something like <vitgerDomain>/shorturl.php?id=1234567890ABCDEF&direct=1&workflow_id=13
In this example URL 13 is the ID of the Workflow, which should be executed. You get this ID from the Workflow Overview or the Permission entry configuration.
5. Test the Setup
If you test the form and get a message “ACCESS_DENIED for <IP>”, then you misconfigure the Permission Entry and needs du adjust the IP rules. If this happens, you also get a small number in Workflow Designer Sidebar and a log entry within the HTTP Handler.
